

Build system
Build automation is the process of automating the creation of a software package. In general it includes: compiling source code, running automated tests, and the creation of a installation package. Build-automation tools allow the automation of simple, repeatable tasks. When we use them we improve team efficiency and production as well as product quality. As a result of it we achieve faster product delivery. When we choose a build system we should take into consideration if we want:
- to support multiple compilers
- to use various IDEs,
- to support different OSs
- to use CI (continuous integration)
When the build systems come into play we should be familiar with a notion of a target. The build systems![]()
![]() organize files into targets. Each target corresponds to an executable or library, or is a custom target containing custom commands or actions the build tool must perform, such as installing an application, whereas a project is a logical group of targets gathered together into a self-contained collection that can be built on its own. Projects are the containers that developers use to organize source code files and other resources. When we think about building of software project two new concepts emerge. A source directory and a binary directory. The source directory is where source code and resource files are located. The build system needs them to create binaries. Inside the source directory there are build system files contain a set of directives describing how to build, test, and deploy a project. The source directory is frequently under version control (GIT, SVN, Mercurial etc). The binary directory is where every items created by the build system are placed. These are object and temporary files, executables, libraries, test output and packages created during the build process.
organize files into targets. Each target corresponds to an executable or library, or is a custom target containing custom commands or actions the build tool must perform, such as installing an application, whereas a project is a logical group of targets gathered together into a self-contained collection that can be built on its own. Projects are the containers that developers use to organize source code files and other resources. When we think about building of software project two new concepts emerge. A source directory and a binary directory. The source directory is where source code and resource files are located. The build system needs them to create binaries. Inside the source directory there are build system files contain a set of directives describing how to build, test, and deploy a project. The source directory is frequently under version control (GIT, SVN, Mercurial etc). The binary directory is where every items created by the build system are placed. These are object and temporary files, executables, libraries, test output and packages created during the build process.
Cross-platform solution
As cross-platform programmers we need a simple build system which we can leverage on many platforms in the same way irrespective of IDE or toolchain we utilize. We use it to configure the build options and create the final applications or libraries from sources. That tasks developers have to repeat several times every day, so it is extremely important to ensure that the process is under control and repeatable.
Powerful duo comes to rescue
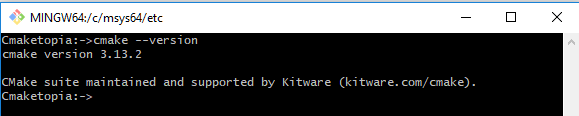
Our project is growing. More and more modules come into play. That will be harder to do all things manually. We need automate a build process. It’s about time we need to get familiar with the main actors of our story. Ladies and gentlemen let me introduce a fantastic couple![]() Cmake and Ninja. As we may expect these are command line tools too. It means we need run they from a shell. Run your shell such a bash on Unix , cmd.exe or Msys2 shell on Windows. Now an operating system is at our command.
Cmake and Ninja. As we may expect these are command line tools too. It means we need run they from a shell. Run your shell such a bash on Unix , cmd.exe or Msys2 shell on Windows. Now an operating system is at our command.
Type cmake --version and press Enter.
Type cmake --help don’t forget about enter, then try out:
cmake --help-command-list
cmake --help-manual-list
Now play with Ninja:
ninja --version
ninja --help

I feel we got the hang of the tools. Although command-line tools often require manuals for the user’s reference, we can frequently try out a “help” option and “version” one too. A more interesting matter is why we use command-line tools. From our developers’ point of view three things are important and crucial. We want to:
- perform building tasks more efficiently and faster
- automate process of building by using scripts
- and finally migrate a building process from a developer’s local machine to a CI server.
Strutting our stuff
Before we’ll delve into building processes, we have the opportunity to present our tools.
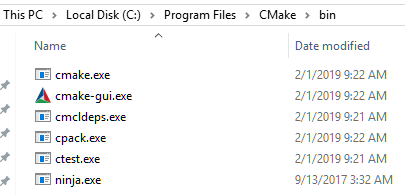
- cmake.exe command-line tool of the cross-platform buildsystem generator
- cmake-gui.exe is Cmake GUI program
- cmcldeps.exe - wrapper around cl.exe (MSVC compiler) that adds /showIncludes to command line. /showIncludes option is an equivalent of gcc -MD
- cpack.exe is Cmake packaging tool
- ctest.exe is a Cmake test runner tool
- ninja.exe is a small build system with a focus on speed.
Get our feet wet
As you may recall from section A typical programmer’s pipeline there are a few " green boxes "(processes) in the flowchart/workflow. Here is a list of processes we don’t want to do manually:
- building
- testing
- deployment.
As you can guess, we want to automate these processes using scripts and CMAKE command-line tools. We will be utilizing cmake.exe to build, ctest.exe to test and cpack.exe to deploy a software package. Let’s start learning how to build a software with cmake.exe. On the whole while triggering a build with cmake we mainly perform a simple workflow:
- generate a project buildsystem
- build a project.
During the generation stage the scripts for the native build tools are created. In next step we use cmake.exe to invoke the native build tools which uses scripts previously generated to create binaries.
Simple executable project - HelloWorld
Open MSYS2 Mingw-w64 command line and create HelloWorld folder (mkdir HelloWorld) for a project. Then run your favourite text editor (notepad for example) and write code as below:
#include <iostream>
int main()
{
    std::cout << "Hello, World!";
    return 0;
}
Save a written source code as hello.cpp in HelloWorld folder.
Create a new file inside the editor (File->New) and type:
# CMakeList.txt : HelloWorld CMake project file
cmake_minimum_required (VERSION 3.8 FATAL_ERROR)

project("HelloWorld" LANGUAGES CXX)

add_executable(hello hello.cpp)
Save text as CMakeLists.txt file. Close the editor. Make build directory. Your project folder structure should look like as follows:
+HelloWorld
|   CMakeLists.txt
|   hello.cpp
|
\---build
You should be inside HelloWorld folder.
Please follow a simple recipe to create and run hello executable.
mkdir build
cd build
cmake -GNinja ..
cmake --build .
./hello
Close MSYS2 terminal. Now open Developer Command prompt for VS and go where your project is located:
REM remove build directory
rmdir build /s
mkdir build
cd build
cmake -GNinja ..

Whoops! A wrong compiler is selected (if you have two or more compilers installed). Although this is MSVC environment I don’t know why but cmake chooses g++ compiler when you use Ninja generator (-GNinja). We have to fix it. We can do that in two ways:
settings environment variables
REM you can omit .exe I leave it for clarity
set CC=cl.exe
set CXX=cl.exe
or adding additional parameters to cmake call. I prefer the second one. Go back to the top![]()
REM remove build directory
rmdir build /s
mkdir build
cd build
cmake -G "Ninja" -DCMAKE_C_COMPILER=cl.exe -DCMAKE_CXX_COMPILER=cl.exe
cmake --build .
./hello
Discourse
Now when we’ve completed the whole work, it’s time to shed some light on to answer the question “What on earth is going on here?”. To start with we have to get familiar with a few ideas (I took definitions of Source Tree, Build Tree and Generator from cmake documentation):
Source Tree
The top-level directory containing source files provided by the project. The project specifies its buildsystem using files as described in the cmake-language manual, starting with a top-level file named CMakeLists.txt. These files specify build targets and their dependencies as described in the cmake-buildsystem manual.
Build Tree
The top-level directory in which buildsystem files and build output artifacts (e.g. executables and libraries) are to be stored. CMake will write a CMakeCache.txt file to identify the directory as a build tree and store persistent information such as buildsystem configuration options.
To maintain a pristine source tree, perform an out-of-source build by using a separate dedicated build tree. An in-source build in which the build tree is placed in the same directory as the source tree is also supported, but discouraged.
Generator
This chooses the kind of buildsystem to generate. See the cmake-generators manual for documentation of all generators. Run cmake –help to see a list of generators available locally. Optionally use the -G option below to specify a generator, or simply accept the default CMake chooses for the current platform.
When using one of the Command-Line Build Tool Generators CMake expects that the environment needed by the compiler toolchain is already configured in the shell. When using one of the IDE Build Tool Generators, no particular environment is needed.
CMakeLists.txt
A human-readable text file containing the entire platform independent build specification which gives a description how to build the whole project. CMakeLists.txt file located in the top-level source directory is the entry point for cmake during configuring the project source tree.
Let’s analyze hello cmake project top-level configuration file line by line:
- cmake_minimum_required (VERSION 3.8 FATAL_ERROR) - sets the minimum required version of cmake and establish policy settings for a project. It should be called at the beginning of the top-level CMakeLists.txt file;
- project(“HelloWorld” LANGUAGES CXX) - sets the name and c++ as the supported language of the project. The target name must be globally unique within a project;
- add_executable(hello hello.cpp) - creates target hello and adds executable target hello to be built from the source file hello.cpp.
Cheer up, still only the building process remained for us to discuss in detail. We do it short and sweet but step by step. It’s a common pattern of building procedure. Because we want to use Ninja build system we have to specify a generator explicitly otherwise a default platform generator will be used. To list available generators for current platform type cmake --help command in your terminal. See below we call cmake.exe twice first time when we want to generate files for a native build system and second one when we run build process. You may ask why we don’t run ninja.exe in a second step directly. Well, let’s imagine that we saved that list of commands in a script, in this case if you change the generator, you must change the call of the native build tool too. If you call cmake.exe in the second step it runs a proper build tool automatically for you. Additionally we don’t need to remember mappings the generator <-> the native tool.
mkdir build               - to avoid a hotch-potch create a build directory for buildsystem files
cd build                  - go inside the build directory
cmake -GNinja [params] .. - generate files for Ninja (-GNinja) look for CMakelists.txt in a parent directory (..) specify additional parameters for a project buildsystem generating process
cmake --build .           - build project (--build) using current directory (.) as the build tree
Hierarchical project - Area and Perimeter Calculation
Under construction stay tuned ![]()