

Command Line
In everyday work as a beginner we usually work with IDE and we don’t use command line tools thus so naturally simple questions come into a head “Mouse isn’t enough?” “Command Line - why bother?”. An answer is simple “Crawl! Walk! Run!”. From a software developer’s perspective the most important reason to do that is - “Running, compiling, and testing software can be much more efficient when using the command line”. Just close IDE and you have more memory for a build process. Additionally, tasks can be performed far more efficiently, some diagnostic tools are available only through a command line. But for me the most important reason is FREEDOM!!! We can separate a build process from our IDE, create a pipeline and get to utilize advantages of automation.
Highway to Hell for a tough cookie
Our previous levels were a breeze, but from then on the story shifts gears. Get up on your feet we start grappling with basis of a command line. A wise deviser![]() have to understand the relation between components to solve problems of their domain and how the compilation pipeline looks like. The grasp of this concept is crucial. We must be deft like a swan, which glides
have to understand the relation between components to solve problems of their domain and how the compilation pipeline looks like. The grasp of this concept is crucial. We must be deft like a swan, which glides![]() across the surface of the lake. Stop being like a rabbit
across the surface of the lake. Stop being like a rabbit![]() caught in the headlights controlled by your favored IDE.
caught in the headlights controlled by your favored IDE.
Rule No. One - You’re a boss and you know the ropes.
Rule No. Two - The command line is your friend.
Rule No. Three - The compiler is your friend.
A typical programmer’s pipeline
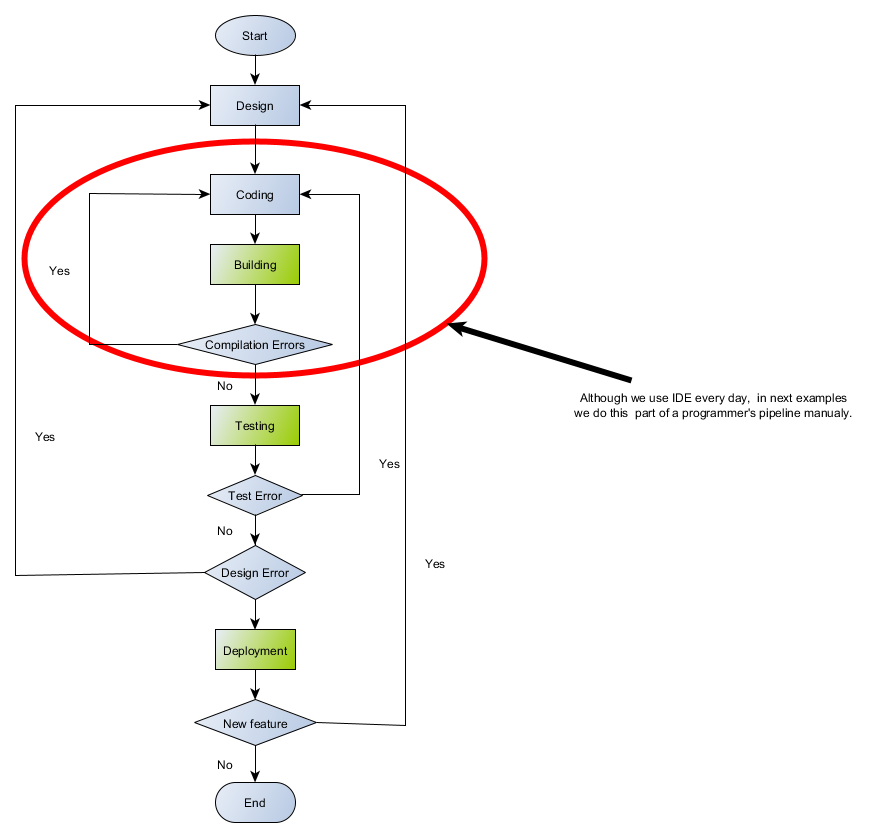
Figure 1.1 A programmer flowchart
Design is the process we create a specification of a solution.
Coding is the realization of an application.
Building is the process of converting source code files into standalone software binaries.
Testing is the process of checking quality and finding bugs.![]()
![]()
![]()
Deployment is all of the activities that make a software system available for use.
In this tutorial we’ll use CMake. It is a suite of tools which can help us to end up our project successfully. It is useful from building then testing right through to preparing packages ready for distribution.
Source code
C++ supports separate compilation. We can split our program into several files, each of which can be compiled independently. In short .h files contains declaration, .cpp files hold definitions, implementation within themselves.
Header file
To make a compiler happy all names in C++ must be declared before they can be used. Thus header files contains declarations of variables, functions and classes. They cannot contain definitions. There is more. See Declarations and Definitions.
Preprocessor Definitions
In C++ source code we utilize preprocessor definitions to adapt a set of source files to create several build configurations depended on a type of compiler or operating system.
Predefined Macros
Although we didn’t supply their definitions we can use them as macros. These are predefined macros. There are four classes of them: standard, common, system-specific and the named operators. The named operators cannot be undefine. Some predefined macros depend on compilers options. How can we check active predefined macros? For gnu compiler it’s simple. Open gnu compiler environment and type: gcc -E -xc++ -dM /dev/null in your terminal. For MSVC open developer command prompt x86 then x64, compile checkpredefines.cpp from my Cmaketopia repository cl /c /EHsc checkpredefines.cpp . See some macros are platform specific. _Win64 macro for instance.
To find out how it works see snippet below.
#define __STRINGVALUE__(x) #x
#define __VALUE__(x) __STRINGVALUE__(x)
#define __PPOUT__(x) "#define " #x " " __VALUE__(x)

#if defined(_ATL_VER)
    #pragma message(__PPOUT__(_ATL_VER))
#endif
Compilation environment
To work properly a compiler needs a correct operating environment. The tools in the toolchain are command-line build tools, which need several environment variables to work properly. Variables are customized for your installation and build configuration. For instance Visual C++ command-line tools use the PATH, TMP, INCLUDE, LIB, and LIBPATH environment variables. (see detail Set the Path and Environment Variables for Command-Line Builds). For GNU compilers see Environment Variables Affecting GCC. As a cross-platform programmers we should think abstractively. Try to think of building process in general terms and treat your build tools as a implementation of a part of this abstraction. Just like OOP. When I write a terminal or a console I mean any implementation of it, macOS, Mintty for example. A shell, it can be Bash, Cmd or PowerShell. To prepare a compilation environment Windows toolchains provide scripts (see details piggybacking for MSVC and MSYS2 that set a number of environment variables required for build tools. On Linux there is typically a dominant C++ compiler and the compiling environment is set out of box. A process of building binaries manually can be described as follow:
- open your terminal/console;
- if it’s applicable set any environment variables required by your toolset;
- enter commands for a building (compile, archive, link)
For Windows users. Although using shortcut Mingw64-shell is preferable very often for Mingw64 compiler setting Path variable is enough to make the compiler work. To set variable write in command line:
set PATH=<directory where your Mingw64 compiler is>;%PATH%;
Building binaries
We need the three basic tools ![]()
![]()
![]() to build C++ applications. These are the compiler
to build C++ applications. These are the compiler![]() , the linker
, the linker![]() , and
the librarian
, and
the librarian![]() . Remember these are command line tools. Again a toolchain is a set of these programs and additional tools. The compiler transforms C++ source code files and produces object file. The librarian create a static library from a set of object files. The linker takes object files and libraries and resolves their symbolic references to generate an executable (application) or a dynamic/shared library. The object files and static libraries are only needed during building an application. An executable may depend on dynamic/shared libraries thus they are essential during the execution of app and have to be accessible when the application is running. What is more one shared library may rely on other shared ones.
. Remember these are command line tools. Again a toolchain is a set of these programs and additional tools. The compiler transforms C++ source code files and produces object file. The librarian create a static library from a set of object files. The linker takes object files and libraries and resolves their symbolic references to generate an executable (application) or a dynamic/shared library. The object files and static libraries are only needed during building an application. An executable may depend on dynamic/shared libraries thus they are essential during the execution of app and have to be accessible when the application is running. What is more one shared library may rely on other shared ones.
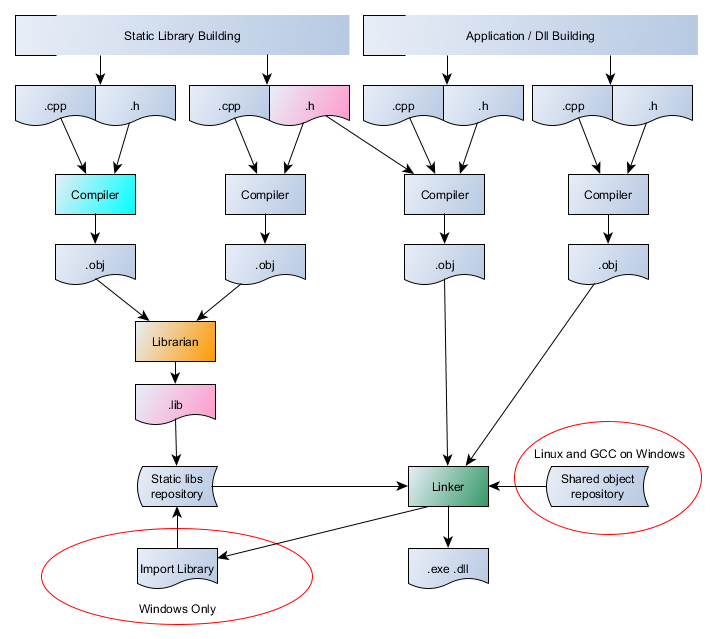
Figure 1.2 The compile and link process.
The figure above presents The Three Musketeers (a compiler, librarian and linker) in action. On the left you see a process of creation of a static library, which is later linked to an executable or dynamic link library by the linker. Every program that uses a library facility must include its associated header. Therefore in the previous compilation stage of our application we had to include a library header. On Windows when a program contains exports additional import library is created by the linker. An import library is a library that automates the process of loading and using a dynamic library. On Windows this is a small separated static library, the only exception is GCC which can links shared object (.so) directly. On linux a share object (.so) works as dynamic and import library and can be specified as input to the linker.
Compilation process
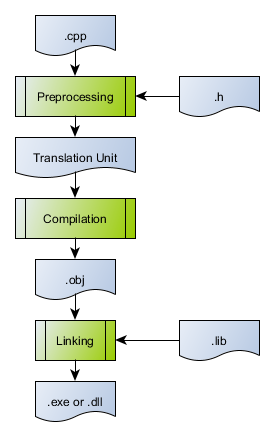
Figure 1.3 The compilation process.
In the first preprocessor stage the contents of all header files (.h) are included into source file (.cpp). A translation unit is created. It means that all macros are expanded, #pragma information is added, each #ifdef/ifndef is validated. Sections of code is included or skipped respectably. The each translation unit is compiled and an object file is generated. The object file contains native machine code and information about external references. In the next stage the linker resolves external references, joins code from other object files or libraries. If the linker finds all externals the executable or dynamic dll is generated. Otherwise no binary is produces and error messages from the linker are sent to the console.
Building executable
It’s time for our first Hello![]() example. A source code for hello application is below.
example. A source code for hello application is below.
#include <iostream>
int main()
{
 std::cout << "Hello, World!"
 return 0;
}
Look at the Figure 1.1, we are just after the design step. We decided to use the standard cout function in our application that writes text to standard output stream which prints the “Hello, World!” string on our monitor. No bad, very good design!
Go on and get your hands dirty !
- Coding
 - a preparation App Source Code:
- to do this run a simple text editor for an example Notepad or Notepad++;
- write a program and save a file to the disk to a location of your choice
(I use “c:/TestCmaketopia”). Name the file “hello.cpp”.
- Building - a creation of an executable to run on your platform
- open terminal;
- set your compilation environment for your toolset;
-
enter a command in command line to compile and link your program
One step building - the compiler automatically invokes the linker after compilingCompiler Compiling+Linking Compilator Environment Clang clang-cl hello.cpp Developer Command Prompt for VS MSVC cl /EHsc hello.cpp Developer Command Prompt for VS Mingw64 g++ -o hello hello.cpp Mingw-w64 Shell Two steps building - we have to enter two commands, in first step object file is created, in second step linker creates executable
Compiler Compiling Linking Clang clang-cl1 /EHsc -c hello.cpp lld-link2 hello.obj /out:hello.exe MSVC cl /c /EHsc hello.cpp link -out:hello.exe hello.obj Mingw64 g++ -c -o hello.o hello.cpp g++ -o hello hello.o
D’oh!![]() We’ve got a bug,
We’ve got a bug,![]() .Back to square one (Coding
.Back to square one (Coding![]()
![]()
![]() )!!!
)!!!
Run your editor open hello.cpp file add ; after “Hello, World!” save your file.
Here is a correct version of code.
#include <iostream>
int main()
{
 std::cout << "Hello, World!";
 return 0;
}
Compile your source code again. Now, after we do that and assuming that we didn’t make any typos and the code compiles fine, we have a file called hello in the source code directory, and now we can finally run our hello app.
Type ./hello in command line and press <Enter>. and no surprise it will print Hello, world! to the terminal.
Our next task is a creation of a math module in two forms - a static or dynamic library. A few words about our Sum project. Sum project are split across multiple source files. This splitting simplifies a development and speeds up compilation. The project includes Sum.cpp - main program. Calculator.cpp - our math module. Calculator.h contains declarations of Calculator class. We want to group math operations into a library. To build Sum project we have to use a compiler to compile the source files into object files. Next steps depends on what kind of a library we want to create. The last step is always the same, we use linker to resolve externals.
Build a static library
Static libraries is a set of object files (with typical extension *.obj or *.o), composed into a single file (.lib). It should not contain any specifying storage-class information (__declspec or __attribute((dll…))). We need create a static library using a librarian. Next we link main Sum object with a library to create executable.
Clang-cl toolchain
| Step | Command |
|---|---|
| compile Sum.cpp into object file | clang-cl -c -EHsc Sum.cpp |
| compile Calculator.cpp into object file | clang-cl -c -EHsc Calculator.cpp |
| create static library Calculator.lib | lld-link /lib -out:Calculator.lib Calculator.obj |
| create executable SumClang | lld-link -out:SumClang.exe Sum.obj Calculator.lib |
Mingw-w64 toolchain
| Step | Command |
|---|---|
| compile Sum.cpp into object file | g++ -c -o Sum.o Sum.cpp |
| compile Calculator.cpp into object file | g++ -c -o Calculator.o Calculator.cpp |
| create static library libCalculator.a | ar ru libCalculator.a Calculator.o |
| create executable SumGCC | g++ -o SumGCC Sum.o libCalculator.a |
MSVC toolchain
| Step | Command |
|---|---|
| compile Sum.cpp into object file | cl -c -EHsc -FoSum Sum.cpp |
| compile Calculator.cpp into object file | cl -c -EHsc Calculator.cpp |
| create static library Calculator.lib | lib -out:Calculator.lib Calculator.obj |
| create executable SumMSVC | link -out:SumMSVC.exe Sum.obj Calculator.lib |
Build a dynamic library
A dynamic library consists of code and data that are loaded into your application at run time. The structure of dynamic library and the executable is identical, the only difference being that dynamic library lacks the startup routines (main entry point). The dynamic library can’t be started as independent program by platform alone. Another important issue concerning a dynamic library is symbol visibility. On Windows most toolsets don’t export symbols by default. In particular, the Microsoft Visual Studio Compiler doesn’t export any symbols. Each symbol must be explicitly exported when the dynamic library is built. It’s imported during building an executable or dynamic library that want to refer to it. To export symbols we use the __declspec(dllexport) attribute, again the attribute __declspec(dllimport) to import. Quite the contrary MinGW exports ALL symbols of a DLL by default. The same on Linux. In this example I show how linking the DLL directly using MinGW compiler.
In Mingw-w64 shell
| Step | Command |
|---|---|
| create dynamic library CalculatorDll | g++ -fPIC –shared -o CalculatorDll.dll Calculator.cpp |
| create executable DynamicSum | g++ -L. -lCalculatorDll -o DynamicSum Sum.cpp |
If you want to see __declspec(dllexport/dllimport) example finish reading and jump to Project Organization.
Piggybackings
Additionally we have available piggybackings, the facilities for programmers who like building executables from command line. See below how to use shortcuts to set environment variables begladding your compiler on Windows 10 platform:
MSVC
For detail see Build C/C++ code on the command line and C/C++ Build Tools.
These shortcuts below open Command Prompt and set a compiler environment; just use one of them
Hey a tough guy wanna more?
If you have not standard installation of Visual Studio or you are curious, do you want to know where a workhorse is?
Right click x86 Native Command Prompt select More select Open file location
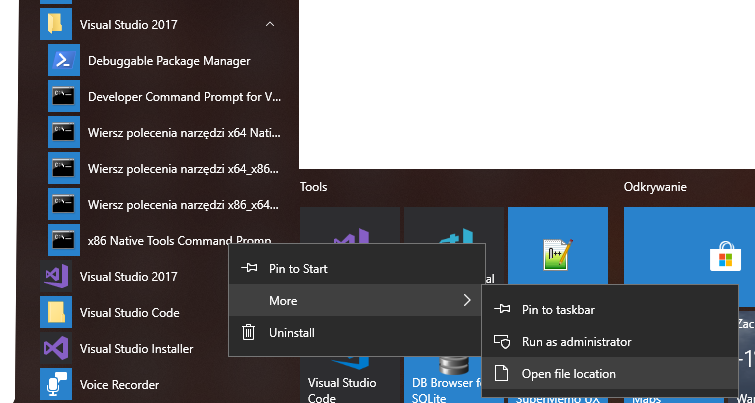
now right click on x86 Native Tools Command Prompt select Properties click inside Target field select all (cntr-A) copy (cntr-c) open your text editor paste string (cntr-v) save file. Important!!!
Don’t worry we are on home straight now!
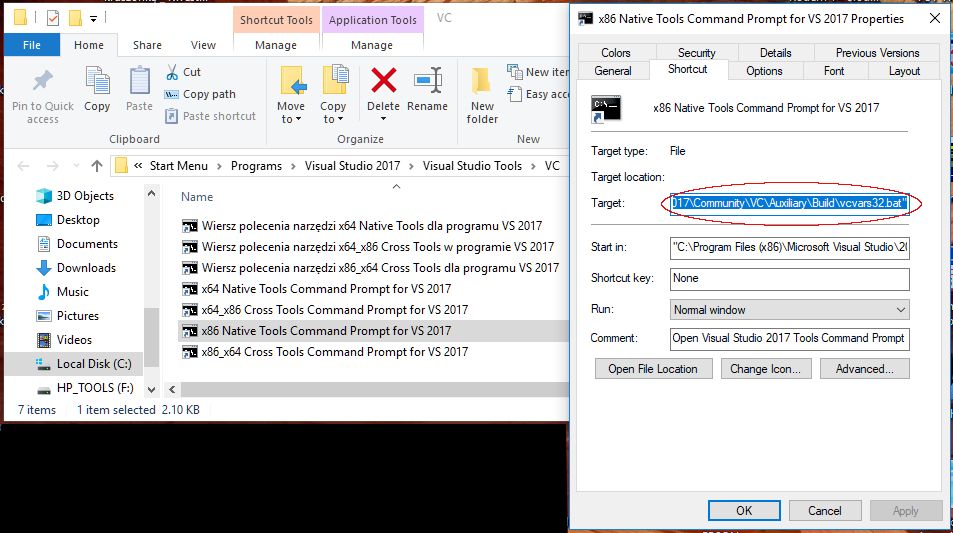
You should have something like that in your file
%comspec% /k “C:\Program Files (x86)\Microsoft Visual Studio\2017\Community\VC\Auxiliary\Build\vcvars32.bat” extract path
C:\Program Files (x86)\Microsoft Visual Studio\2017\Community\VC\Auxiliary\Build
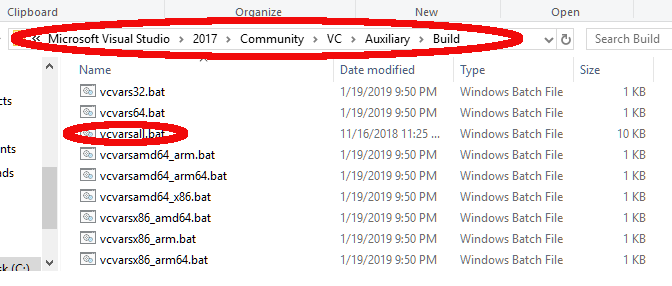
Now it’s time for a party! Open file explorer put your path in it, look there is vcvarsall.bat .
IT’S OUR WORKHORSE![]() !!!
!!!
A procedure for CMaketopians how set up MSVC compiler environment:
- open command line
- set PATH=C:\Program Files (x86)\Microsoft Visual Studio\2017\Community\VC\Auxiliary\Build;%PATH%
- cmd /k “vcvarsall.bat x86” or
- cmd /k “vcvarsall.bat x64”
see vcvarsall.bat documentation
More?
Change cmd /k “vcvarsall.bat x64 to cmd /k “vcvarsall.bat x64 & PowerShell” and have fun.
From then on you can use PowerShell as your terminal.
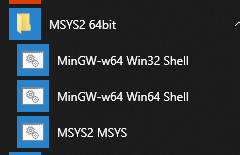
MSYS2
MSYS2 is software distribution and a building platform for Windows. It provides a Unix-like environment, a command-line interface and a software repository. MSYS2 MSYS shortcut opens POSIX-compliant environment. Use it for package management, shell scripting and building POSIX projects. When you click MING-w64 shortcuts they create windows GNU compiler environment x86 or x64 respectively.
By default, MSYS2 automatically dumb your PATH environment variable down. To display your MSYS2 path setting run MSY2 terminal, type export -p | grep PATH. You can change this behavior by setting an Windows system environment variable MSYS2_PATH_TYPE=inherit . When you set it, MSYS2 inherits PATH variable from Windows. Fortunately, MSYS2 allows a user to do some a fine-grain customization also. To do that you need to know where your home directory is. Type export -p | grep HOME. The default $HOME directory is C:/msys64/home/<username>. Launch Notepad and edit bash_profile file from your home directory. To let Cmake windows installation run into MSYS2 environment I added path referred to Cmake.exe. If you want to use other apps modify PATH settings respectably.

For more details see Bash or Environment Variables Affecting GCC
If you created Sum project together with me, you should have a directory named Sum with many files.
\---Sum
        Calculator.cpp
        Calculator.h
        Calculator.lib
        Calculator.o
        CalculatorDll.dll
        DynamicSum.exe
        libCalculator.a
        Sum.cpp
        Sum.o
        Sum.obj
        SumClang.exe
        SumGCC.exe
        SumMSVC.exe
What a big mess you must admit. Binaries mixed with headers and source files. Now imagine your project has a hundred source files… Well, we’ll deal with the problem soon.
Building SQLITE binaries from source code
After wasting your time on reading about all this stuff you may ask “What the heck is going on?”. Is it really important to know building toolsets? Let me answer your questions now. There are many fantastic open source projects but I want to show you something special and very popular. This project is in the public domain, it means that you’re free to use it for any purpose, commercial or private, and there are no legal restrictions and no copyright notices that you need to distribute. I want you to get to know SQLite. This is an incredible little database engine, very fast and lightweight. SQLite is a database engine implemented entirely in the C programming language with source code freely available. Suppose that a new version of SQLite is available with new features, we need in our super project now. We checked NuGet, GitHub but nobody prepared a new release of SQLite library with extra compiler’s switches we need. So we must do it ourselves. Instead of losing time on creating a huge project, we will do it very simple. You, PowerShell and MSVC compiler will be enough.
Try your hands at doing it!
First we’ll create the SQLite shell program to play with a new toy. Please, follow these simple steps:
- cd c:\
- mkdir SQLite
- launch your browser
- go to SQLite.org
- download the SQLite Amalgamation to c:\SQLite
- run x64 Native Tools Command Prompt
- type powershell in command prompt and press enter
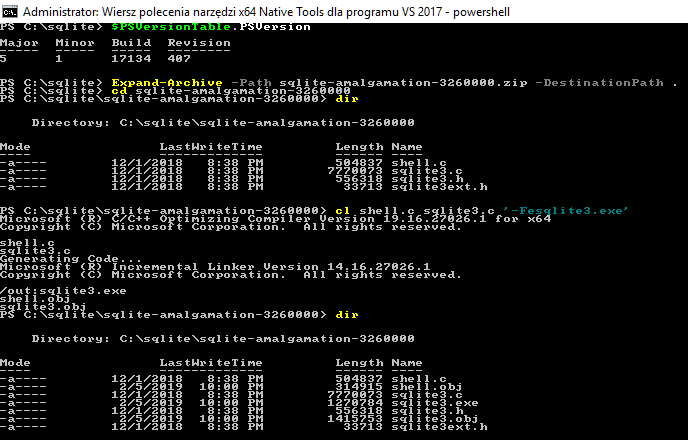
- cd c:\SQLite (see a picture below to see a compilation session)
- check PowerShell version $PSVersionTable.PSVersion if > 5 you can unzip a file using a command line
- Expand-Archive -Path sqlite-amalgamation-<yourversion>.zip -DestinationPath .
- cd SQLite-Amalgamation-<yourversion>
- run cl shell.c sqlite3.c ‘-Fesqlite3.exe’
Now run a new toy. Type ./sqlite3 <Enter>
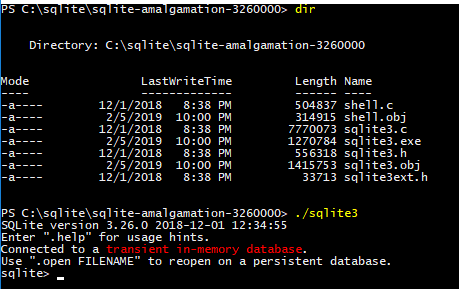
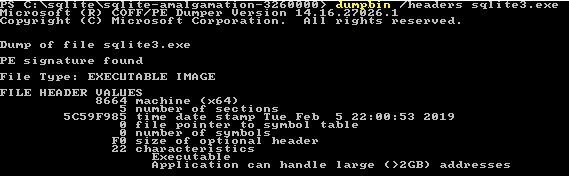
One small detail, how to check if sqlite3.exe is a x64 application. Run dumpbin /headers sqlite3.exe
To build SQLite dll type:
cl sqlite3.c -‘DSQLITE_API=__declspec(dllexport)’ -link -dll ‘-out:sqlite3.dll’
 and check exports
dumpbin /exports sqlite3.dll

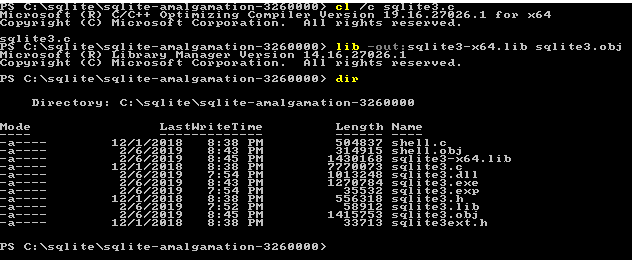
and extra step - static library (you can do it)
Repeat the same with clang-cl:
- clang-cl shell.c sqlite3.c ‘-Fesqlite3.exe’
- clang-cl sqlite3.c -‘DSQLITE_API=__declspec(dllexport)’ -link -dll ‘-out:sqlite3.dll’
Next use gcc compiler to create sqlite3 shell.
Open Mingw-w64 environment and type:
- gcc.exe -DSQLITE_OMIT_LOAD_EXTENSION -DSQLITE_THREADSAFE=0 -O3 -DNDEBUG -c shell.c
- gcc.exe -DSQLITE_OMIT_LOAD_EXTENSION -DSQLITE_THREADSAFE=0 -O3 -DNDEBUG -c sqlite3.c
- gcc shell.o sqlite3.o -o sqlite3
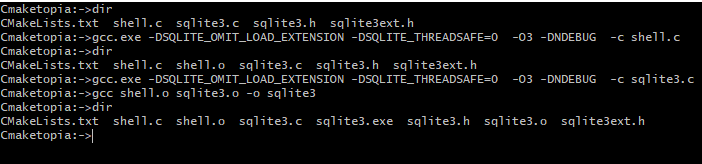
It’s your turn to create share object (.so) and static library (.lib)
If you don’t know how to do it, click the icon at the top-left of this page.
The fruits of our last work.

Additionally see what preprocessor definitions we can use to customize our build. There is more on my blog “Okay, Houston, we’ve had a problem here”.
Wrap-up
Go ahead! From then on, you have knowledge what to do and where are the knobs. Although in our daily work we use IDE now you know what is going on under the hood. All is under our control. We are not rabbits ![]()
![]() now.
now.
After this part of the tutorial you should understand notions of:
- source code
- header file
- predefined macro
- preprocessor definition
- translation unit
- toolchain
- compiler environment
- compiler
- librarian
- linker
- object file
- static library
- import library
- executable
- dynamic link library
Remember, you don’t need a sledgehammer to crack a nut.
Make everything as simple as possible but not simpler!
The kiss principle![]() for everyone.
for everyone.
Because we need to keep projects clean and tidy. It’s high time to put all items in apple-pie order.
Next topic Project Organization (try Next navigation at the bottom).
It’s curtains now, chill out![]() and press the button below if you want.
and press the button below if you want.
-
A driver program for clang that attempts to be compatible with MSVC’s cl.exe. It works in Developer Command Prompt for VS environment. Remember about consistence of your compiler environment, your compiler version (32 or 64 bit) and a version of build target. For example: I use 64-bit clang-cl compiler and want to build 32-bit version of app. I need to open x86 Native Tools Command Prompt for VS 2017 and force 32-bit build. To do that I should enter command: clang-cl –target=i686-pc-windows-msvc -v /EHsc -c hello.cpp in my terminal. -v option gives me additional piece of information about the current compiler environment ( libs, includes etc. ). To force building 64-bit app open 64-bit compiler environment and try:
clang-cl –target=x86_64-pc-windows-msvc -v /EHsc -c hello.cpp
When your compiler environment is compatible with the compiler version (32/64-bit) –target option can be omitted. ↩ -
LLVM Clang linker. It’s also possible to use Microsoft link.exe with the same options instead. ↩